Monday, July 17, 2017

Rekenreks and beyond

During this past school year, we (the other Instructional Resource Specialists and our Coordinator of Mathematics and Science PreK-5) were invited to visit mathematics classrooms in the Foxborough Public School district to see their implementation of Guided Math Workshop.  We loved seeing the amounts of manipulatives and activities that were going on while teachers were working with small groups.

One of the many ideas I took out of that visit were the use of Rekenreks, especially in the younger grades.  Rekenreks are a tool to facilitate number sense in students.  The activities are endless with this one tool.  I wanted to get the staff in my building on board with using these, so for one of our Learning Teams meetings that I was facilitating with Grades K and 1, we made a set of student rekenreks.

Materials:  Cardstock, laminating sheets, hole puncher, pony beads in various colors, pipe cleaners, packing tape

I laminated pieces of cardstock and cut them into 4 rectangles.  Then, I poked holes in where the pipe cleaners would be threaded through.

To get the beads ready, each pipe cleaner needed 10 beads (2 sets of 5 in different colors).  Pipe cleaners were then threaded through the holes in the cardstock, and then secured with packing tape.


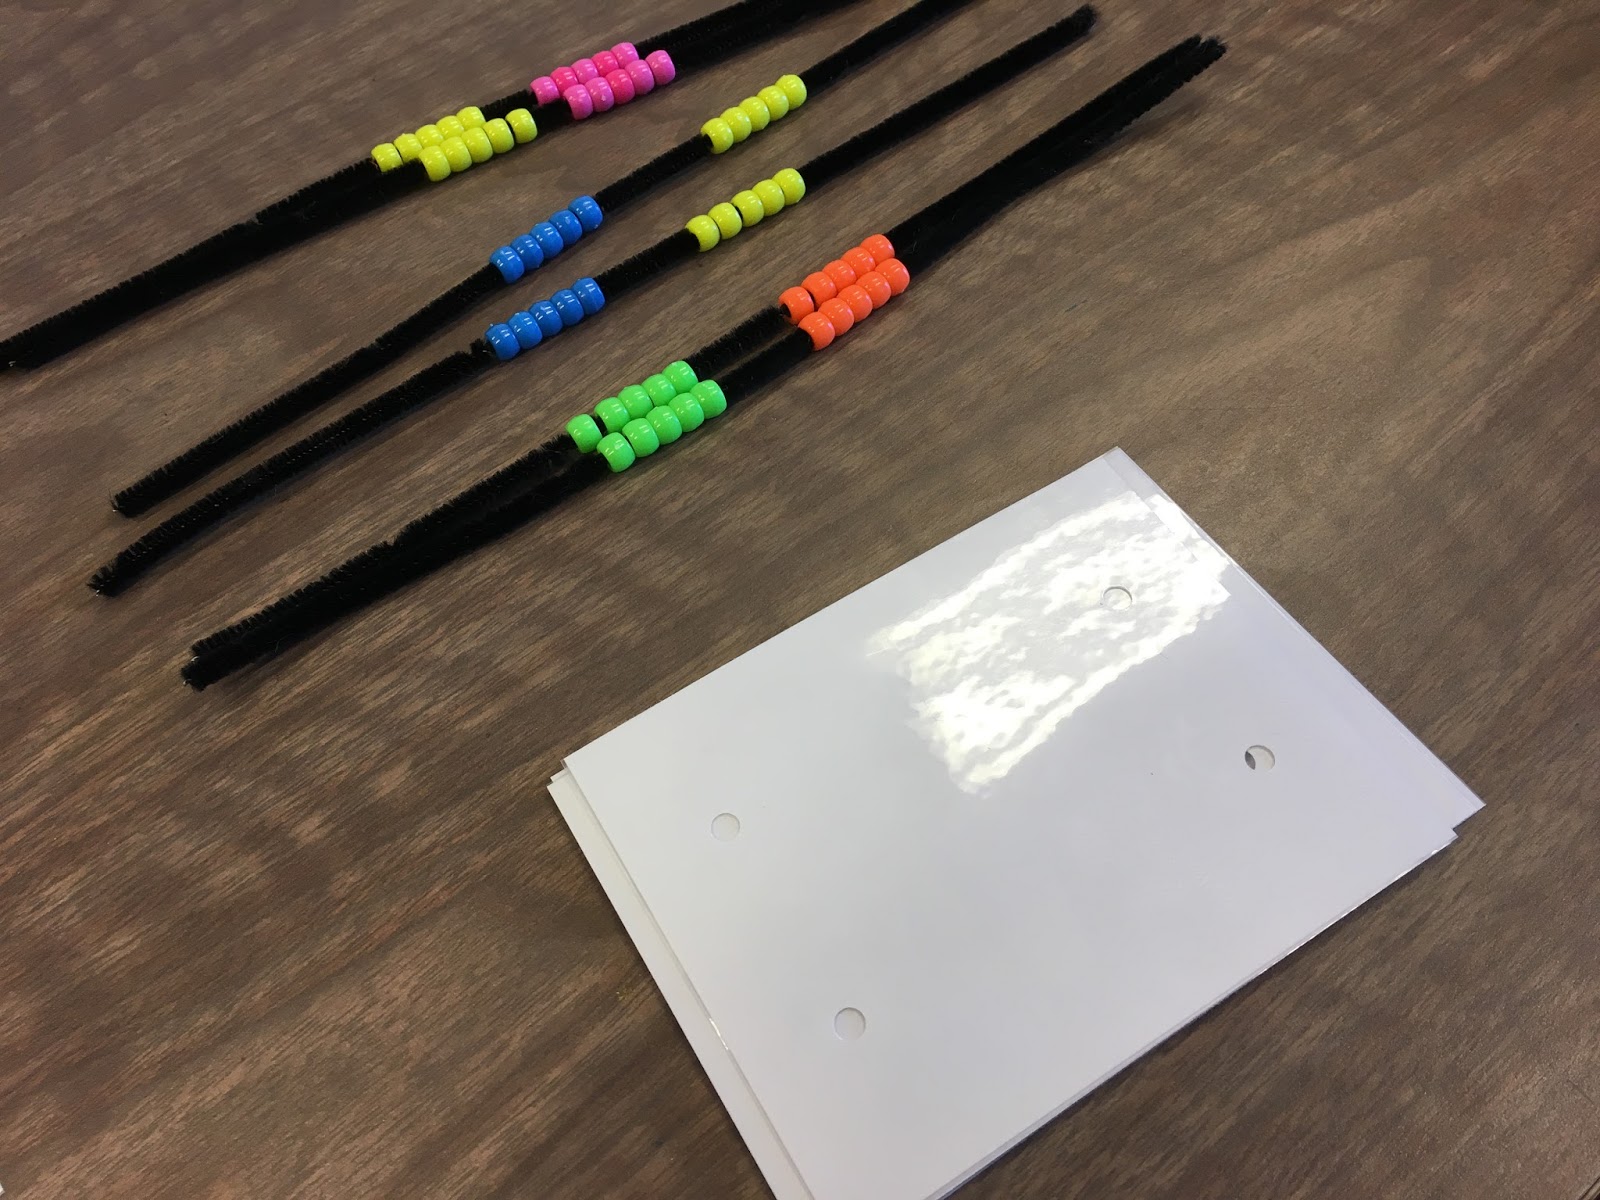
Teachers went away with a set of 10 student rekenreks from this meeting.  My goal for this coming school year is to front load the teachers with activities that can be used with the rekenreks they created.

At the beginning of the summer, I attended the Foxborough Public Schools Summer Institute and signed up for the rekenreks session to build my knowledge on this particular manipulative.  Within that session, another type of rekenrek was used, and I've already made myself a set of student ones:


My daughter, Madison, got in on the fun and threaded these beads with me!  These bead laces are made with 100 beads.  And similar to the two-row rekenreks, the activities are endless.  I'll post a list of activities for both these manipulatives soon!!


Tuesday, July 4, 2017

Back to Blogging... Again! And Teacher Toolboxes... and ETSY!

Summertime is here again!  Which means that I have a little bit of time to get back to blogging (three kids keep me extremely busy lately...  By October I'll have 5, 3, and 2 year olds.. yikes!)

I'ts been a tough time in our district again this year...  huge layoff numbers and lots of "blue slips" (elimination of positions) again...  and if you haven't guessed it, my position was cut again for the third year in a row.  Right now we (this time the group of Elementary IRSs were eliminated as well as two other groups) are very unsure of our position - if our position will be reinstated, or if we are all going back to the classroom.

Since I'm in the waiting game (again), I'm getting back into the mode of getting a classroom ready, just in case.  Today I took the time to make a few Teacher Toolbox Organizers and put them up on Etsy...  Here's what they look like (and the titles are linked to them in my Etsy Shop:


26 Drawer Organizer - 6 large drawers and 20 small drawers.  Blue and Green themed.


24 Drawer Organizer - 24 large drawers.  Blue and Green themed.


44 Drawer Organizer - 12 large drawers and 32 small drawers.  Pink and Purple themed.

And if you're interested, you can order an organizer and customize it to whatever color you want the labels to be and what you want the labels to say!  Use this link: Custom Teacher Toolbox Organizer

Vicky and I are starting up an Etsy shop...  It is in its very early stages...  there will be more to come once her baby boy arrives in August!  But for now, just teacher toolbox organizers!

Cousin Craft Creation - make sure you like our page!


Summer is just beginning, so there will be more to come!

Wednesday, August 17, 2016

Toolbox Organizer (again!)

So, last summer I blogged about my Toolbox Organizer that I made for my new classroom at the Plouffe (when my IRS position was eliminated for the first time).

Lucky for my permanent substitute, I left this for him when my position was reinstated in November, while I was on maternity leave.  Apparently it has been quite the hot item at the Plouffe!  I'm so glad I've motivated others to create their own! :)

Since I'm heading back into the classroom again in September, I decided it was a perfect time to create another one!  I used the same file I bought from www.teacherspayteachers.com (https://www.teacherspayteachers.com/Product/Teacher-Toolbox-CHEVRON-EDITABLE-organizing-labels-tools-796754) and this year I just kept it to two colors.  I used the editable pages, cropped and copied just the green and blue labels, pasted them into a new page, and created text boxes over the labels using a different font.  I absolutely love how this one came out...


I even made two copies of the labels so I could label the back of the drawers, too (those pieces in the way are the drawer dividers if needed).  You never know if people will see the back of the toolbox, so it's worth it to label both sides to keep everything looking neat!


Tuesday, July 5, 2016

Life is too short to have boring hair!

I totally wish I took a before picture of the absolute MESS of my hair drawer in my bathroom, and the mini-bin I had of all the hair elastics that were in this house.

I ended up getting an organizer to hang in the girls' closet for their necklaces and bracelets, before we got them their own jewelry boxes.  I didn't like the way that worked, so I had these organizers for the longest time not knowing what I was really going to use them for.

I went through a huge organizing spree this weekend.  One of the things that had to get organized was the hair elastics and my hair drawer.

Here's what the final product looks like:


One of the great things about this organizer is that it's double sided!  I have plenty of pockets to work with!


And it fits perfectly with a 3M hook in the main bathroom in this space that otherwise goes unused!


Wednesday, June 29, 2016

Organization Bin for Children's Work

So I finally got to finish organizing Madison's first year of Pre-School - TONS and TONS of artwork.  I'm so glad I decided to take a picture of everything she brought home - I'm in the process of making her a photo book of all her Pre-School work.  That will be for another blog entry :) 


I am so excited about how the organization bins came out!  Because I was in the mode, I already set Samantha's up, and started to set up Jackson's (of course I ran out of materials, so I'll finish his eventually ... poor third child!).

Materials I used (for one bin):
- 1 Filing bin (link to the one I ordered)
- Decal of child's name (left over from the Growth Chart decal)
- 20 Hanging File Folders and 1 Extended Tab Hanging File Folder
- Hanging File Folder Labels (picture below of the titles I used for the labels)
- 2 sheets of Avery 8163 Shipping Labels


Here's the list of titles I used for the hanging file folders:
- Medical Information
- Baby Book
- Dancing School
- Sports
- Pre-School - Year 1
- Pre-School - Year 2
- Kindergarten
- First Grade
- Second Grade
- Third Grade
- Fourth Grade
- Fifth Grade
- Sixth Grade
- Seventh Grade
- Eighth Grade
- Ninth Grade
- Tenth Grade
- Eleventh Grade
- Twelfth Grade
- College

and of course, color coded for each kid!

Labels for each of the school folders.  School Year, Grade, School Name, and Teacher Name.  I placed all the extras in a folder at the front of the bin so they're easily accessible when I need them!

My eldest helping me organize the bins!

All organized! (poor Jackson, I know!)

Here's how the Avery Shipping Labels are used to mark the school folder.

A better look at the Hanging File Folder labels.

All three bins... I love these because it makes everything uniform, and they stack up nicely!


Growth Chart

I've been going back and forth on whether I wanted to create individualized growth charts for each of my kids... or create one that they all share.  I found this idea on Etsy through Pinterest, and decided to order the decal for the growth chart with the kids' names on the side.


I was going to have hubby create a wooden piece that I could attach the decal of the growth chart on, but after thinking about it, I was asking myself where I would store it, where could we put it...but I wasn't having any luck.

Instead, I decided I would put the decal right on the wall in our hallway.  We have a perfect area between our bedroom doorway and the linen closet.  Here's how it came out:


And the names that came with the decal?  I ended up using them for the organization bins in the next post!

Oh, the Places Our Kids Will Go!

So I'm definitely a Pinterest addict (at least I can admit it, right?)...  And I found this idea that I absolutely loved...


Basically, it's a generic letter to my kids' teachers to sign in their "Oh, the Places You'll Go" book by Dr. Seuss.  Each kid has their own.  I did search Pinterest for the teacher letter... and I did a google search for images for "Oh, the Places You'll Go" and found the background I used for the letter.  Then, I printed the letters out on cardstock, and placed them in a protective binder sleeve, trimmed the binder edge, and placed the letter in the inside front cover of the book.  They're ready to go for each of the kids, and I'm storing them in their organization bin (next blog post!)


Saturday, June 25, 2016

Back to Blogging!!

So I have been MIA for quite a while...

At the end of last school year I was "Blue Slipped" (my position was cut, so I was to be placed back in a classroom) and nervously waited a majority of the summer for my "placement call."  Out of the choices I was given, I took a Middle School Math position.  Since I was 9 1/2 months pregnant, I needed all the help I could get - hubby helped me move my belongings out of my old school and to my new classroom; mom and dad helped me clean (and when I say clean, I mean REALLY clean) my new classroom and set it up for my 7th grade students.


My new school was extremely welcoming, and they couldn't believe I was carrying around the large beach ball of a baby belly at the start of the school year.  I wasn't due until around September 30th, but it was baby #3 and this was my second pregnancy in less than a year.

The school year began - I worked 8 school days, and on Saturday, September 12, 2015, my son was born!

While on maternity leave, I ended up getting reinstated in my position that was originally cut.  The substitute that was covering my classroom was the next one to be hired back from the massive layoffs from the previous school year, so I was glad my students would get some consistency even after my maternity leave was over.  The substitute was a great fit for the position and the school, so everything worked out in the end!

Getting back into the swing of things after having baby #3 and starting back at my old position 3 months into the school year was not an easy task.  I already felt behind the eight ball since our building took a big hit starting the year with only two administrators (from a team of 5), absorbed a huge influx of students from one of the buildings that condensed from a K-8 to a K-5, and losing many positions which led to less faculty members.

Blogging certainly was not on my radar this past school year...

But I'm back!

My oldest finished her first year of preschool... (*stay tuned for my first organization blog with her school stuff*)

My middle child's personality is coming out in full force - and she's talking up a storm...

And my youngest is the most relaxed one of the three of them.

I'm finally getting a good night's sleep (crossing my fingers I didn't just jinx that) and am even going to take two online courses this summer so that I can earn some post-grad credits.

Since I was "Blue Slipped" again this school year, I'm not quite sure yet where I will be placed.  Of course my anxiety has already kicked in, however I'm trying to channel that anxiety into the courses I will be taking, and getting back into blogging creative organization ideas.


Thursday, August 15, 2013

Teacher Toolbox Organizer

Ahhh... getting back into the swing of things!  It certainly has been a while since I've posted... In the past year, my husband and I welcomed our daughter, Madison, into the world.  She is now a year old and such a joy!  I've been working on decorations for her birthday party, and will post a blog on that after this weekend.

I definitely had my ups and downs this past school year with starting the year off on a maternity leave... and then trying to balance work and baby.  I think the major bumps are over now; Madison is on a great schedule... and I think I have part of my baby brain back!  I just finished my first project for my classroom this year, and it's actually something for me, not my students or anything for my classroom management.  I even had the time to make one for a friend, too!  I got the organizer from Lowe's (about $16) and the labels I bought from Teacherspayteachers.com (http://www.teacherspayteachers.com/Product/Teacher-Toolbox-CHEVRON-EDITABLE-organizing-labels-tools-796754).  Just some cutting and double sided sticky tape, and it was all done!  I even made a second copy of the labels so I could put on the backs of the drawers, just in case I end up putting the organizer on my desk and others can see the back of it.

Here are pictures of the befores and afters...

 The organizer from Lowe's... Before

 The front of the organizer.... After

and the back of the organizer


So easy to do....and I like it so much better than some of the drawer organizers I have for my desk!

Wednesday, July 18, 2012

Teacher Assistant of the Week

At my school we have a span of grades K-8.  I still don't think the middle school grades get the same experience as others in the city, but that's for another day...

Since our kids only see 2 content teachers (myself and my coteacher), I teach Math and Science and my coteacher teaches ELA and Social Studies to both our homerooms.

One of the ways we still get our kids to help us out in the classroom is having a Teacher Assistant of the Week.  This way we don't have to assign a million and one jobs for the classroom to our kids like the elementary part does, but our kids still learn a bit of responsibility week by week.  And, the Teacher Assistant of the Week gets to help out in both rooms.  When I have my coteacher's homeroom, all I have to do is ask who the assistant is, and they are also my assistant when I have that class in front of me.  It alleviates the constant picking and choosing students to help out with things that need to be done around the classroom (passing out books, getting mail from the office, etc.)

So for this coming school year, I made a checklist, laminated so kids can use it everyday, for the morning routines they have to help me with, and the afternoon routines they must complete before the end of the day.  I didn't have the checklist this past year, and my kids were pretty good with getting things done (until we got towards the end of the year), so I'm hoping the checklist will be a good addition to the classroom routine this year.

Here's a picture of the checklist that I have on a clipboard.  I'm going to attach a white board marker so they can literally check off everything they've done, and just erase with a tissue.


One of the jobs the Teacher Assistant of the Week has to do is record assignments for those that are absent.  So I made this folder (the Make Up Assignments page is from Pinterest...thanks, Laura Candler)  and inside are copies of the Make Up Assignments page.  I tend to tell the Teacher Assistant of the Week to not fill one out until the end of their first class, since many of my students come to school late.  But the assistant is responsible for getting the assignments organized for the person who is absent.


I also made a back to include more spaces in case a student is absent for more than one day.